
Whippletree flooring is a natural product that, even when cross laminated to create an engineered floorboard will display a marginal amount of expansion and shrinkage as the ambient humidity levels rise and fall.
Pre-Delivery
UNDER FLOOR HEATING
When fitting over under floor heating certain guidelines must be followed:
Under floor heating must be fully installed, pressure tested, and up and running for long enough to ensure that any moisture has been expelled from the sub floor. (max 1.8% CM at RH 45% to 55%). All wet trades must have finished.
CONVENTIONALLY HEATED AREAS
Once all wet trades have been finished make sure the room is warm and dry, ie. 20ºC to 22ºC with a humidity of 45% to 55% RH.
On Delivery to site/project
UNDER FLOOR HEATING
Provided that the sub floor is dry enough and the RH in the room is stable (45%-55%), then bring the flooring in, unwrap the packs and stack them in the room with plenty of space around each pack to allow the flooring to warm up and acclimatise. It’s a good idea to move the packs around every few days so that the bottom packs are moved to the top etc, always ensure that the bottom packs are at least 50mm off the sub floor and it’s a good idea to put battens between each layer of packs (leave the under floor heating running to give a room temperature of 20-22ºC and RH 45%-55%). Acclimatise for at least 10 days prior to fixing.
CONVENTIONALLY HEATED AREAS
Provided that the sub floor is dry enough and the RH in the room is stable (45%-55%), bring in the flooring and unwrap the packs, stacking with plenty of space around each pack to allow the flooring to warm up and acclimatise. It’s a good idea to put battens between each layer of packs (leave the heating running to give a room temperature of 20-22ºC and RH 45%-55%). Acclimatise for at least one week prior to fixing.
Fixing
UNDER FLOOR HEATING
When the flooring has been acclimatised and is ready to fix, turn the under floor heating down to give a floor temperature of 15ºC to 18ºC. Lay the floor (see below for typical methods), then in accordance with the adhesive and sealant/finish manufacturers curing times, increase the floor surface temperature by 1ºC per day until up to normal levels (27ºC is the suggested maximum floor temperature for Engineered Hardwood flooring).
CONVENTIONALLY HEATED AREAS
When the flooring has been acclimatised and is ready to fix, with the heating running at normal levels mentioned above, lay the floor (see below for typical methods).
Laying/Fixing Method Guidelines
Whether laying over under floor heating or where there is conventional heating there are essentially four fixing methods:
WHEN FITTING OVER UFH WE HIGHLY RECOMMEND THE USE OF THE FULL CONTACT ADHESION METHOD TO ENSURE PROPER HEAT TRANSFER.
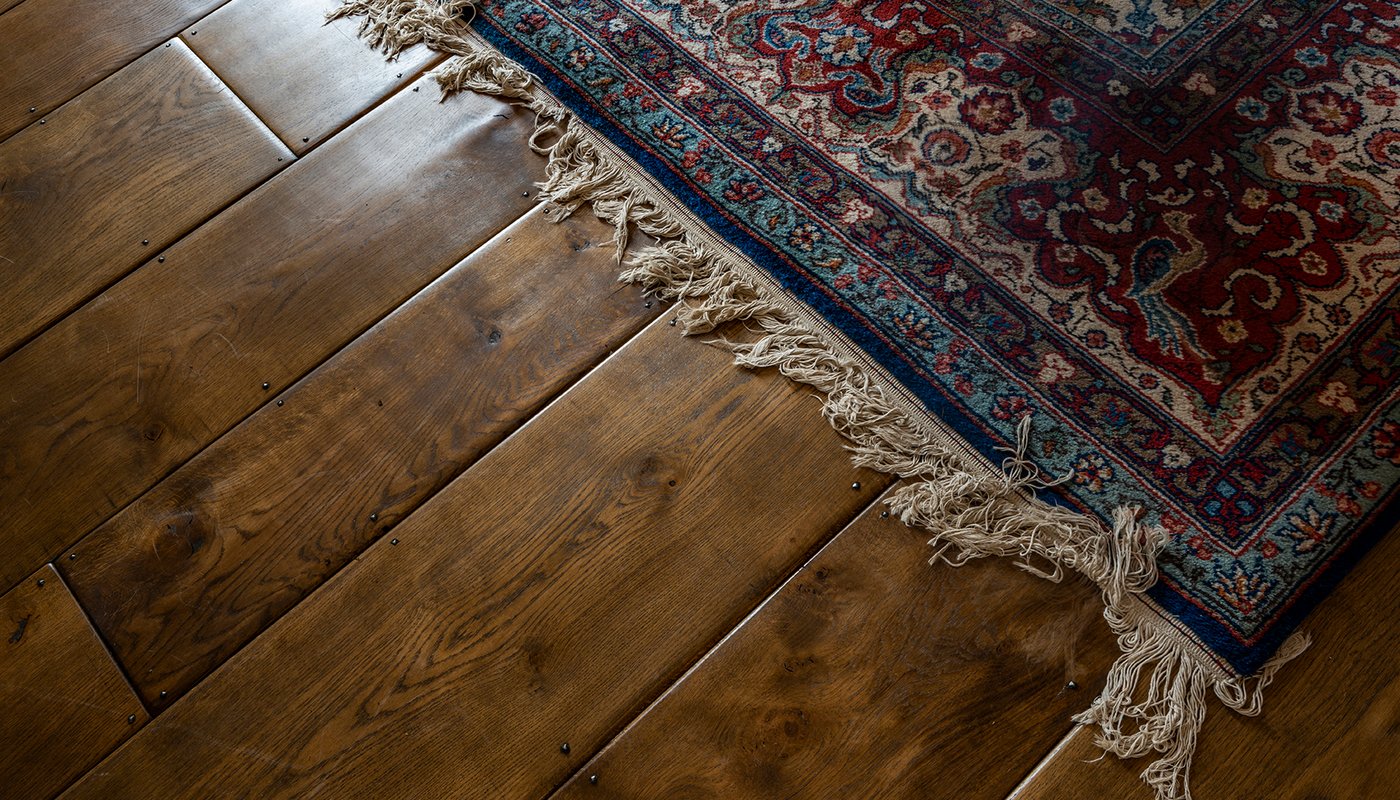
Fixing to battens or joists – Secret fix
For flooring up to 220mm wide, screw or nail at 45º through the top inside corner of the tongue. We recommend the use of a flexible flooring adhesive between the underside of the board and the top edge(s) of the joist or batten. Note: do not glue T&G together.
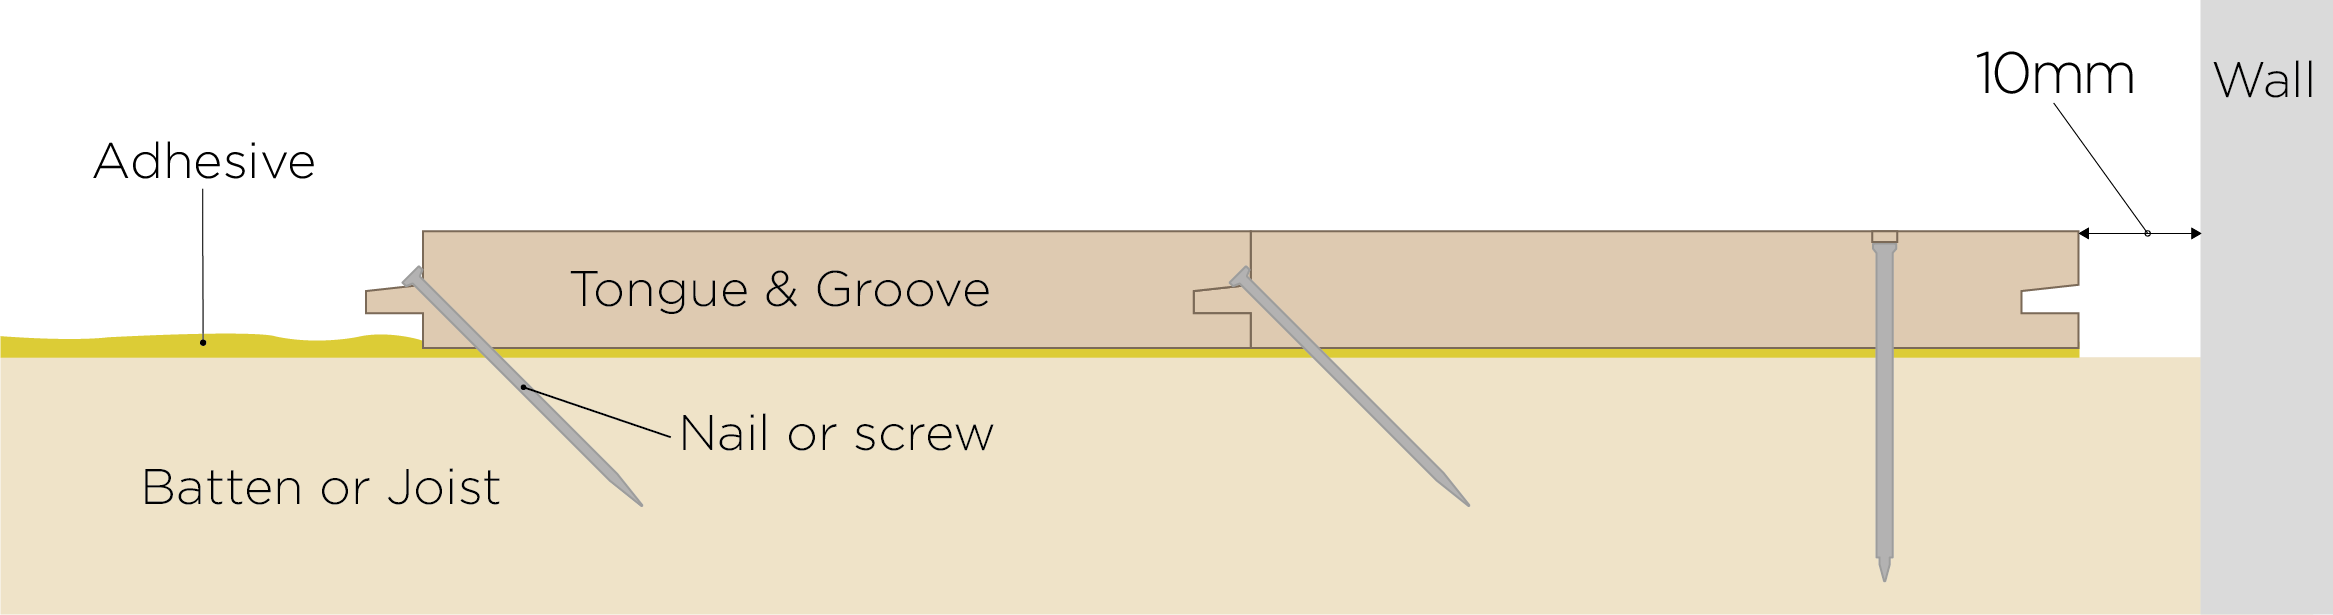
Fixing to battens or joists - Face-fix
For any width of flooring (This method must be used for boards that are over 200mm wide), the boards can be:
- Screwed and plugged.
- Fixed with lost head nail, and then the nail hole filled, or a visual ‘face nail’ can be used.
- Visual face nail with cut rosehead showing.
We recommend that all nail holes are pre-drilled through the floorboard and that a flexible flooring adhesive is applied between the underside of the board and the top edge(s) of the joists or batten. Note: do not glue T&G together.
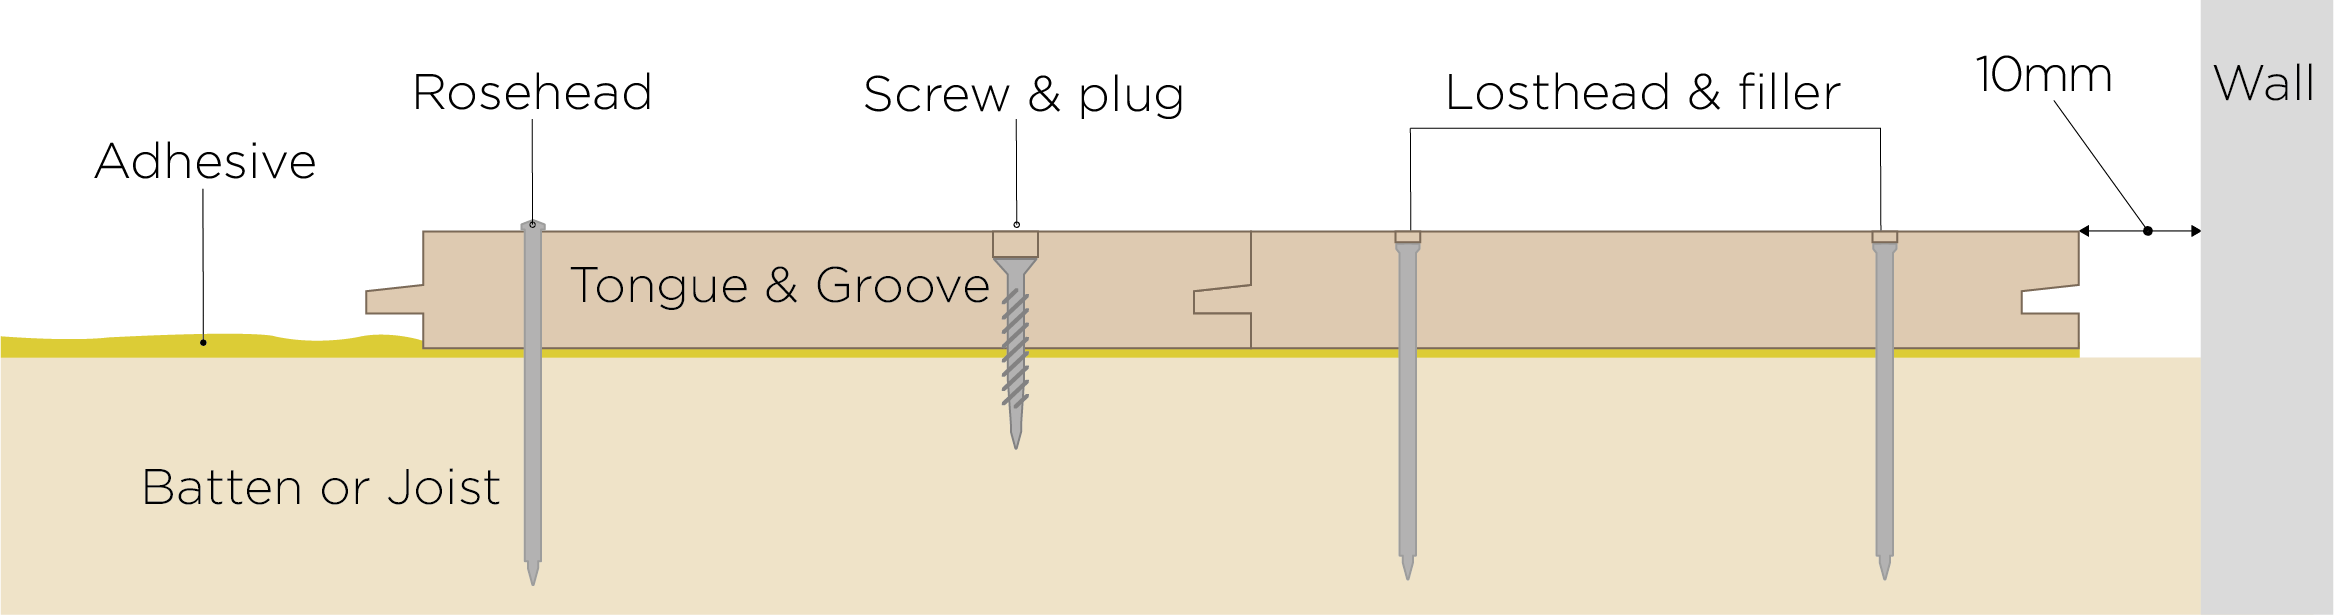
Fixing to ply or chipboard decking
As above, both secret-fixing and face-fixing methods can be used. Again, we recommend the use of a flexible flooring adhesive being applied between the decking and the underside of the board, at the fixing point.
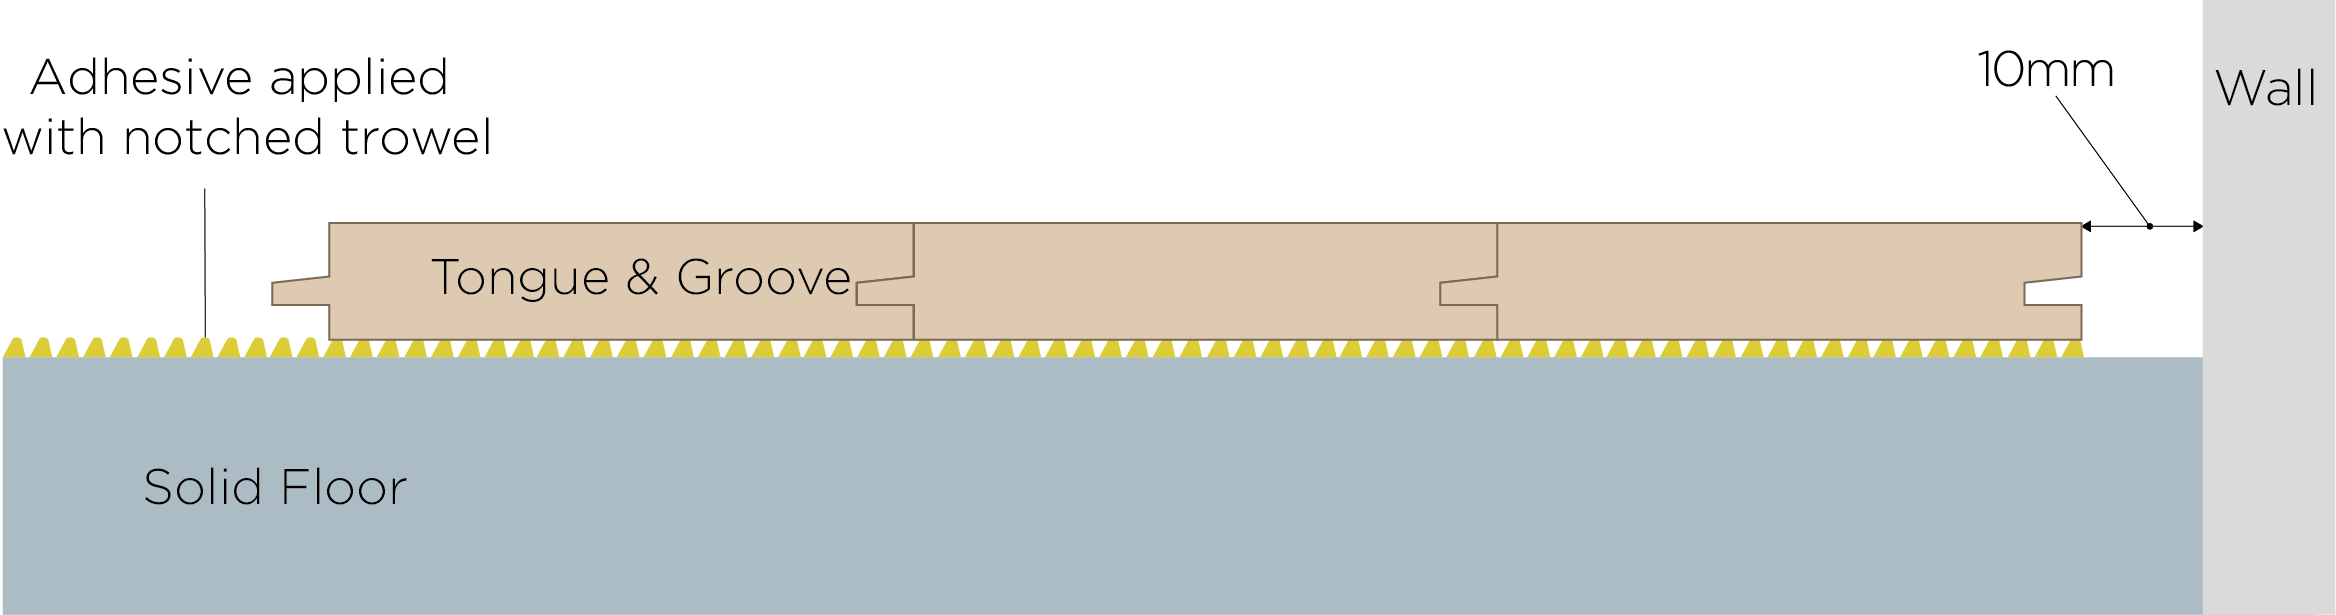
Full contact adhesion to ply, chipboard or hard floor
Floor clamping straps or similar and weights, will have to be used to keep the boards tight and held down, as the adhesive sets. Only glue down those areas of boards you can comfortably fit prior to the adhesive setting, then clamp and leave to cure. It is vital you keep the adhesive off the board’s face, for as this adhesive is rubberised, it is often difficult to sand off and will create marks when the final sealant is applied.
Sealing
PRE-FINISHED BOARDS:
Once the floor is completely laid and fixed, carefully and thoroughly clean (a very light rub with scotchbrite if heavily soiled). Once completely clean and clear of any fixing/fitting marks, apply one coat of Osmo Polyx oil (in accordance with manufacturers instructions) in either matt or satin. Keep off for 24 hours to allow the finish to harden before walking on and 48 hours before moving furniture/rugs in. The sealing is important as the pre-finish on the flooring is a 1st coat and may not resist staining/marking from spilt liquids…
UN-FINISHED BOARDS:
Once the floor is completely laid and fixed, carefully and thoroughly sand in accordance with good sanding practices. Once completely sanded with a final grade of 120 or 150 grit, and clear of any fixing/fitting marks, apply two coats of Osmo Polyx oil (or similar) in either matt or satin (in accordance with manufacturers instructions). Keep off the final coat for 24 hours to allow the finish to harden before walking on and 48 hours before moving furniture/rugs in.
Protection
Once the sealant has been allowed to harden off, cover the entire floor with protective card or hardboard to prevent damage occurring during the final finishing stages (fixing of skirting etc.). Tape the joints and avoid using polythene.
Cleaning
The main cause of wear/scratching to a wooden floor is a lack of cleaning. Consequently, a build-up of dust/grit that, when trodden in, can lead to abrasive action and damage to the surface. Where there are outside doors immediately adjacent, maintaining washable mats and regularly vacuuming the floor will help. Where washing is required, only use a well-wrung mop head or microfibre pad. Remember, water causes wood to swell, so floors should not be saturated during cleaning. Note that the manufacturer of the sealant applied to the floor will supply a recommended cleaning or care product.
Wearing in
Solid wood floors ‘wear in’. While it is disappointing when a new floor gets scratched, frankly it is unavoidable. However, as time goes by, it is these very marks of wear and tear that contribute to the floor’s aging and increasingly interesting character.
